

Blogging involves so much more than writing posts. You have to plan, schedule, create assets, do SEO and marketing, the list is endless. There are loads of tools out there to help you stay organised with your blog. A lot of them are niche, many more only offer one solution to one particular problem. I chose to use Evernote for blogging to stay organised, research, and plan content.
For over eleven years, Evernote has likely been the most powerful app in my own personal toolkit, and the one I most heavily rely on every day. I use it at work, at home, and on the road travelling. So when it came down to starting Tidymalism, it was a no-brainer. I didn’t need yet another new app to add to the overwhelm. I could use Evernote for blogging to keep everything in one place and plan ahead.
What Is Evernote?
I’ve mentioned Evernote in a number of previous posts, but what exactly is it?
It’s a Cross-Platform Filing Cabinet
Evernote is a cross-platform application for desktop and/or mobile that allows you to collect ideas, take notes, organize your life, digitise paperwork, archive everything from your recipe collection to your tax filing cabinet, manage tasks and create and tick off to-do lists. It can be used by one person alone, or a team or group you designate. It’s incredibly easy to use.
You Can Add, Archive, Edit, and Find Everything
You can add illustrations, doodles, mark-up, digital photos, audio, scans, clippings and bookmarks from the web to any note, as well, of course, as text, PDFs, and documents. The best thing is that all of your notes can be annotated, searched, edited, and exported as needed.
Notes are stored on your local device and in the cloud. As a result, if you use Evernote on your MacBook or Windows desktop, for example, you can pull up the exact same notes and notebooks in the Evernote app on your mobile phone, Apple Watch, or by logging into your Evernote account from any web browser. This can be super helpful when you’re on a different computer at work.
It Syncs Across All Devices, All the Time
Everything you input in Evernote is always automatically synchronised with all your devices. This is invaluable in a myriad of situations. It has an integrated calendar and hundreds of templates for your notes, too. You can even email your snippets into your Evernote, or email them out.
There are truly endless ways to use it, and it’s been in my arsenal of daily tools since early 2010. I tried some of the competition along the way, such as Notion and Simplenote. However, I always came back to Evernote within a few days. In my humble opinion, nothing beats its logic, structure, and feature set.
It’s a Scanner and a Web Clipper
Evernote’s integrated scanning function is indispensable. Its real killer app though, in my opinion, is its web clipper browser extension. Once you’ve come to rely on it in your browser bar, you’ll never want to miss it again. The web clipper essentially allows you to automatically clip, tag, and annotate any website or page you’re on in your browser directly to a specific notebook for later reference. You don’t even have to have Evernote open or be logged in. Plus, you can specify the format of the clip, from full page, to a simple bookmark with automatically inserted description, or pure text. It’s genius.
Yes, I’m a huge fan as you can tell. Enough of my raving already. Here’s how you can actually use Evernote for your blog to stay organised and plan your content!
Creating a Notebook Structure in Evernote for Blogging
Download and install the Evernote app, or create an account from within your web browser. I recommend choosing the free version to start with, which you can always upgrade at any time. The free version does have constraints on how much storage space you’ll have, and you can only use it on one device. For beginners though, it’s a great way to ascertain whether you want to invest a few bucks every month for the full version. Which I think you will!
“Personal”, “Professional” and “Teams” versions are all available as upgrades from the free version later on, depending your specific needs.
Setting Up a Dedicated Blogging Notebook
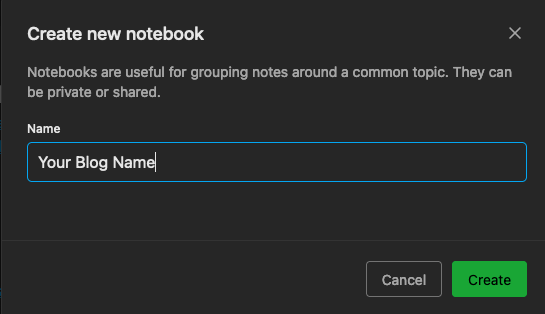
Now set up your blog’s notebook. In the left-hand navigation of your Evernote dashboard, you’ll see a + sign next to your Notebooks. Click that to create a new notebook, and then name it. You might want to give your notebook the same name as your blog.

Stacking Notebooks Inside Your Main Blog Notebook
Now, think of Evernote as a giant, endless filing cabinet for notes, with each notebook you create as a new drawer. You just created a notebook for Your Blog. Inside of this you can stack as many other related notebooks as you like! Much like opening the drawer of a filing cabinet and adding individual file folders for different topics. Or the binders you might have used at school, which you organised by subject and then added different dividers under each subject.

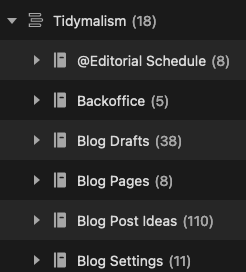
Here’s how I’ve organised my notebooks inside Evernote for blogging, planning, and running Tidymalism.
Example of a Notebook Stack
- @Editorial Schedule. I keep monthly calendars in here for my posting schedule across all channels, as well as a list of my frequently used hashtags. I have prefixed this with the
@character so that it will appear at the very top of my notebook stack instead of being alphabetically ordered. This makes it a snap for me to quickly pull it up. - Backoffice. Contains administrative stuff for taxes and things of a logistical nature like my domain registration.
- Blog Drafts. Although I run Tidymalism on WordPress, I draft every single article here first. Each article is written in its own individual note and this notebook serves as an archive of published posts once an article is fully drafted. Then I just copy my blog draft over to WordPress, do any editing and polishing over there, and add images or any other media assets to the post.
- Blog Pages. This is where I write and archive the copy for all the static pages on Tidymalism such as the About, Disclaimer, and Privacy Policy pages.
- Blog Post Ideas. I use this notebook as a dumping ground to gather all of my random content ideas. Sometimes I’ll save something in here via the web clipper when I’m browsing the web. Other times I might have a spontaneous idea and write myself a note, or drop a bookmark in here. Whenever it’s time for me to start planning a new blog post and I don’t have a specific topic on my editorial calendar, this is the notebook I refer to for inspiration.
- Blog Settings. Notes containing any custom settings I’ve tweaked and would otherwise forget if I ever had to set them again.
- Canva. Ideas for creating my graphical assets using Canva.
- Digital Products. I’ve been working on some ideas for future digital products that might be available on Tidymalism in this notebook.
More Notebooks in My Stack
- Instagram. Hashtag references, infos, tips and ideas I’ve gathered.
- Mailing List. Throughout the month I start collecting bonus content and drafting ideas for my monthly newsletter in here. Each mailing month has its own note inside this notebook.
- Marketing. Where I collect references, tips, and links around guest posting, overall growth, building leads, and the like.
- Monetisation. Here’s where I keep track of any affiliate programmes I’m in, gather new ideas for ones I might like to join one day, and file any information I want to be able to refer to again.
- Outsourcing. I have not had to outsource anything for the blog as of yet, but I know the day will come. This is where I’m collecting good resources I can turn to if I ever need help with coding, content creation, or SEO.
- Pinterest. I track my Pinterest stats in here, collect board ideas and keywords, plus file away any PDF guides I’ve found on the web for Pinterest best practices.
- SEO. Loads of referential best practices, tips, and how-tos that I’ve collected around the web get saved here via the web clipper.
- Socials. Where I keep track of all the places Tidymalism has an account at.
- Tasks & Brainstorms. My to-do lists for the blog, plus any random ideas I’ve had that can’t be categorised elsewhere live in this notebook.
- Twitter. Ideas for threaded content and any Twitter or Mastodon-related tips and tricks land in here.

Stack to Your Heart’s Content!
Your specific blogging situation might call for a notebook structure different from mine. Generally speaking, you can stack your notebooks for different subject areas however you wish.
You might, for example, prefer to set up a “Research” notebook where all of your web clippings land instead of getting as granular as I do. As long as you tag everything accordingly, you’ll still be able to find it with ease when you filter your search by tags.
How to Use Your Evernote Notebooks for Blogging
My most-used everyday notebooks are the Blog Post Ideas, Editorial Schedule, Mailing List, and Tasks & Brainstorms notebooks. These are the ones I file in, refer to, and cross off my to-dos in the most.
As you can see from the above screenshot and run-down of my stack, I set up a range of practical notebooks for various areas related to running this blog. For the social networks I post the most frequently to, Instagram, Pinterest, and Twitter, I keep individual notebooks for thoughts, ideas, and any tips I’ve collected around the web.
Web Clipping, Internal Linking & Evernote Templates
I am an avid user of the Evernote web clipper and almost on a daily basis, I’ll be clipping anything important I stumble upon from the realms of SEO, marketing and monetisation into the respective notebooks.
If I really want to make sure I actually go back and read all the stuff I’ve clipped, I add it to a separate to-do list in Evernote and internally link it from that list. Check out this video on how to create internal links within Evernote. It’s very easy!
At least once a week, I’ll open up my Blog Drafts notebook and sit down to write a brand new blog post. Here we are today, as I write this:

Evernote has many readymade templates for you to work with, including a blog post template. You can also easily create your own template like Michael Hyatt has done. My own blog template always starts off with my keyphrase, meta description, and slug so that I keep those in mind while writing.
In addition, if you’re feeling really fancy, you can even connect Evernote directly to WordPress with these IFTTT recipes. This automates moving your blog drafts over to WP so that you don’t have to cut and paste anything.
How to Find Your Notes in Evernote
How do you find what you’re looking for in Evernote when you have tens of thousands of notes archived in over a hundred notebooks?
Use Descriptive Titles For Your Notes
Now that you have a structure in place for organising and planning your blog in Evernote, you want to be able to easily find everything you’re gathering, collecting, drafting, or editing whenever you need it. For this reason, it’s a good idea to always give your individual notes descriptive titles.
For example, if you create a note about cool stuff in Glasgow, you’ll want to title it with something like “travel ideas for Glasgow,” “Things to do on holiday in Glasgow,” “Minibreak ideas: weekend trip: Glasgow” or the like. More granular titles like these will make it easier to filter your Evernote search results two years from now when you really are on your way to Glasgow and need some inspiration for writing up a post for your travel blog.
Use Tags to Organise and Archive Your Notes
Much like titles, adding tags to your individual notes will make it easier to pull up what you’re looking for from the search results. You can also filter by tag directly in Evernote. In such, tags are a powerful search mechanism.

At the same time, tags can quickly get out of hand if you’re using too many random ones across different posts.
Try to think up a primary set of tags you need across all your blog notebooks, such as #ideas, #affiliates, #seo, #socialmedia or the like. This group of tags can serve as your core, and then you can add more specific, secondary tags to your notes as needed.
For example, on a note about “SEO for beginner bloggers,” you might add an additional tag for #google if it pertains to Google search engine optimisation.
Ready to Make Blogging More Organised?
Evernote is totally worth checking out if you need a better structure to organise your blogging routine. Or for managing your household projects. Tracking to-do lists and capturing workflows. Or simply creating a paperless, digital archive of PDFs and documents so your home office stays uncluttered.
In conclusion, the main reason I love Evernote so much is because it can be used in every area of your life and across all devices. Plus, you can create and collaborate with anyone, from any device or browser.
How about you? I’d love to hear how you use note-taking apps for blogging. Drop a comment below!
UPDATE: Some time after writing this article, I decided to leave Evernote after 13 years and no longer use it. If you’d like to find out what caused me to leave and what I’m using now, check out my post about leaving Evernote and the best alternative note-taking apps. I’m leaving this post up because it continues to accurately reflect my note-taking process and filing structure I rely on every day at home and at work.


Leave a Reply